ARC Raiders Surge Coil Guide: How to Find It, Craft It, and Dominate With It
Everything you need to know about ARC Raiders' most bizarre new deployable trap — from blueprint hunting to game-breaking strategies.
What Is the Surge Coil?
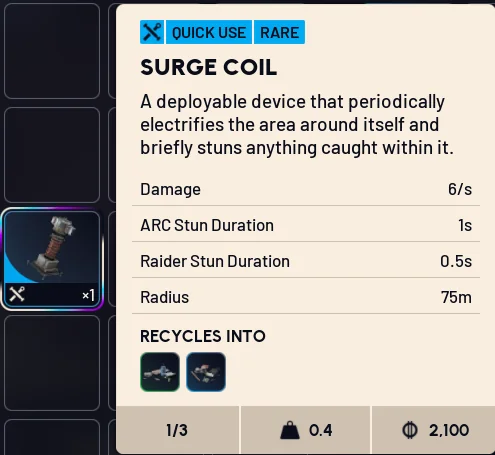 — Surge Coil —
Upgraders has officially added the Surge Coil to ARC Raiders, and it might just be the strangest, most versatile item to ever hit the game. At first glance it looks like a simple deployable trap. But once you understand how it interacts with players, ARC (enemies), and even other Surge Coils, you'll realize this item has layers of potential that most players haven't even begun to explore.
This guide breaks down everything: where to find the blueprint, how to craft it, exactly how it works in the field, and the most effective strategies — both for PvP and PvE — that the community has discovered so far.
How to Find the Surge Coil Blueprint
Before you can use the Surge Coil, you need the blueprint. Here's the key detail: the Surge Coil blueprint is tied to Electromagnetic Storms.
During an Electromagnetic Storm event, the blueprint can drop from containers found throughout the map. Residential containers in particular have confirmed drops — finding it in one of those is a solid bet. The drop behavior appears to mirror the Stat Hook blueprint in terms of where it can appear, so hit as many containers as possible while the storm is active.
There's also an unconfirmed secondary drop condition. Some players believe it may have a small chance to appear during general two-times map conditions, outside of storms entirely. However, this hasn't been definitively proven with video evidence yet. Until that changes, treat Electromagnetic Storms as your primary farming window.
Surge Coil Blueprint Drop Location Summary:
- Electromagnetic Storm containers (confirmed)
- Residential containers during Electromagnetic Storms (confirmed)
- Any container during two-times map conditions (unconfirmed)
How to Craft the Surge Coil
Once you have the blueprint, the crafting recipe is straightforward:
| Component | Quantity |
|---|---|
| Electrical Component | x1 |
| Sensor | x1 |
| Hornet Driver | x1 |
None of these components are particularly rare, which means once you unlock the blueprint, you can potentially maintain a steady supply of Surge Coils for your loadout.
How the Surge Coil Works: A Full Breakdown
Here's where things get interesting. The Surge Coil is a deployable electrified trap that periodically zaps anything within its radius. Let's go through every mechanic you need to understand.
Radius and Damage
Despite what the item description suggests (a listed 75m radius — which is clearly a tooltip error), the actual radius of the Surge Coil is 10 meters. Anything within that 10m bubble is fair game to get shocked.
The Surge Coil deals 6 damage per second and has the following stun durations:
- ARC enemies: Stunned for 1 second
- Raiders (players): Stunned for 0.5 seconds
It Damages You Too
This is the most important mechanic to internalize before deploying a Surge Coil carelessly: it will shock and damage you. The moment you place it down, you enter its radius, meaning you'll start taking damage and getting briefly stunned. Plan your placement accordingly and get out of the 10m zone quickly after deploying.
Lifetime and Destruction
The Surge Coil doesn't have a time-based lifetime. Instead, it persists until one of two things happens:
- It gets shot and destroyed — It doesn't take many bullets to bring it down, so enemy players can quickly dismantle it if they spot it.
- It self-destructs after a set number of zaps — Here's the quirky part: the Surge Coil counts its own zaps, including the ones it sends into itself. So if no targets are nearby, it will slowly count down its own lifespan just by existing.
The Self-Stun Loop
Because the device zaps itself, you'll notice a rhythm when standing near one: approximately every 10 zaps, you'll absorb a 1-second stun. Between those major stun intervals, smaller hits register but allow you to keep moving. This makes running through a single Surge Coil manageable — but running through two is a completely different story.
Using Multiple Surge Coils: The Double Trap Setup
This is where the Surge Coil transforms from a gimmick into a genuine threat.
Two Surge Coils placed side by side will zap each other, depleting each other's lifespans and potentially wasting their charges. That's the trap beginners fall into. The correct play is to space them exactly 10 meters apart.
When positioned correctly with a 10-meter gap between them, anyone stepping between the two coils gets hit by both simultaneously. In a locked room or a choke point, this creates an absolute nightmare for anyone pushing through. The stuns stack and overlap, giving the intruder almost no clean window to react, aim, or shoot back.
Best placement scenarios for dual Surge Coils:
- Behind a locked key-room door, positioned 10m apart so anyone who enters gets instantly double-zapped
- In a narrow corridor where players are forced to walk between them
- On a loot objective where players have to stand still to interact
Is it going to kill a fully kitted raider? No — the Surge Coil isn't a killing machine. But it will absolutely ruin someone's timing, stop them from getting a clean shot on you, and give you a significant advantage in the follow-up fight. Think of it as an anti-rat device: it punishes stealthy pushes into your space and removes the enemy's element of surprise.
Surge Coil vs. Grenades: Can It Stop Trigger Nades?
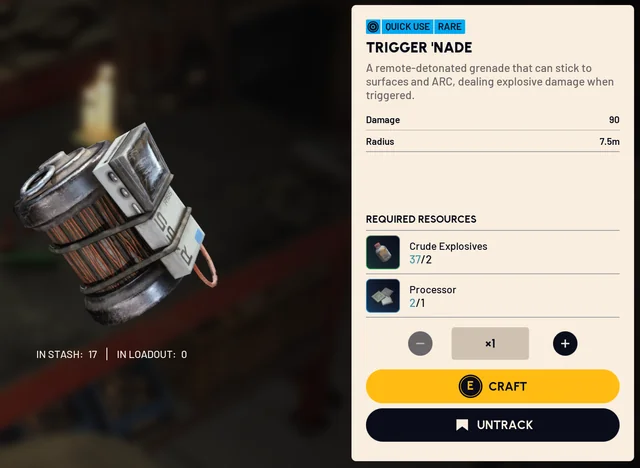 — Trigger Grenade —
This is one of the most exciting discoveries surrounding the Surge Coil. Here's the rundown:
- Standard grenades (e.g., Snap Blast): Not affected at all. They fly over the Surge Coil without issue.
- Trigger Grenades: The Surge Coil zaps the circuitry and instantly detonates the grenade the moment it passes over it.
The Trigger Grenade is arguably the most commonly used grenade in PvP right now. The fact that a correctly positioned Surge Coil can force an early detonation — before the grenade reaches its intended target — gives this item a genuinely powerful defensive utility that most traps simply can't replicate.
If someone throws a Trigger Nade into your key room, base, or choke point and your Surge Coil is positioned to intercept it, the grenade pops harmlessly in the air rather than landing in your face. Combine this with the double-zap stun setup, and you have one of the most punishing defensive configurations in the game.
Surge Coil vs. ARC Enemies: Strange and Powerful Results
The Surge Coil's behavior against ARC enemies is genuinely bizarre — and that's putting it kindly.
ARC Treats It as the Highest Priority Target
The moment an ARC enemy detects a Surge Coil, it will immediately abandon its current behavior and focus entirely on destroying the device. This is more aggressive than how they respond to players. One Fireball ARC was observed leaving its entire spawn zone just to chase down and flamethrower a Surge Coil — and in doing so, blew itself up.
In terms of AI behavior, the Surge Coil essentially functions like a permanent, stationary law grenade — one that can be stuck to surfaces and doesn't expire on a timer.
Damage and Stun Against ARC
As an offensive tool against ARC, the results are more modest:
- It does deal some damage, but less than a standard grenade
- The stun effect is notably weaker than a Showstopper or Hornet Driver
- On targets like the Wasp, the effect is barely noticeable
Breaking ARC AI with Strategic Placement
Where things get genuinely wild is when you position a Surge Coil somewhere the ARC can't actually shoot. When an ARC enemy wants to destroy the coil but physically can't reach it or get a line of sight on it, their AI breaks in hilarious ways:
- A Vaporizer reportedly just gave up entirely and stopped functioning correctly
- A Bombardier with a Surge Coil stuck to its core spent its time spinning in circles trying to find an angle to shoot itself — an angle that doesn't exist
- A Shredder encountered pathing issues, first attempting to shoot it and then sprinting away in the wrong direction as if the coil had become an impassable obstacle
This makes the Surge Coil a powerful tool for neutralizing specific ARC threats by exploiting their priority system. If you're being pressured by a high-damage ARC and need it distracted, slap a Surge Coil somewhere inconvenient and watch it forget you exist.
PvE Strategy: Surge Coil for Trials
One niche but promising use case worth exploring is in Trials farming. Specifically, trials that involve enemies like Ticks, Pops, and Fireballs could benefit from a ceiling-mounted Surge Coil placed at the spawn point.
Since the Surge Coil doesn't expire over time — only after a fixed number of zaps — it could theoretically keep zapping newly spawned weak enemies and racking up points passively. It's not a fully proven meta strategy yet, and a stray raider could easily destroy it, but the concept is genuinely interesting and worth experimenting with in the right trial format.
Surge Coil Weaknesses and Counters
No item is perfect, and the Surge Coil has some clear limitations to keep in mind:
- Low health pool — A Rocketeer ARC can destroy it in a single shot. It doesn't have the staying power of a law grenade.
- Damages yourself — Careless placement means you take stun damage too.
- Visible to opponents — Experienced players will shoot it on sight before engaging.
- Self-zap timer — If it has nothing to zap, it zaps itself and eventually self-destructs.
- Two coils too close cancel each other out — Placement precision matters more than quantity.
Surge Coil Quick Reference
| Stat | Value |
|---|---|
| Blueprint Source | Electromagnetic Storm containers |
| Crafting Materials | 1x Electrical Component, 1x Sensor, 1x Hornet Driver |
| Effective Radius | 10 meters |
| Damage | 6 per second |
| Stun (ARC) | 1 second |
| Stun (Raiders) | 0.5 seconds |
| Lifetime | Zap-count based (not time-based) |
| Trigger Nade Interaction | Forces instant detonation |
| ARC Priority | Highest — overrides player aggro |
Final Thoughts
The Surge Coil is one of those rare additions that rewards creative thinking. It's not a straightforward weapon, and it won't win gunfights on its own. But in the hands of a player who understands its mechanics — the dual-placement stun trap, the trigger nade interception, the ARC AI manipulation — it becomes a surprisingly powerful tool.
Expect the community to continue finding new applications for this item. The fundamentals are solid: find it in Electromagnetic Storms, craft a couple, and start experimenting with placement. The raiders who figure out the ceiling-mounted Tick zapper or the perfectly spaced locked-room killbox are going to have a big advantage over everyone still treating it like a novelty.
Keep an eye out for community discoveries and check back as the meta around the Surge Coil continues to evolve.
Guide based on testing by the ARC Raiders community. Have a new use case or map-specific tip? Drop it in the comments below.